Pages

where sisters, sibling rivalry, and creativity collide.


Saturday, August 31, 2013

Easy as Pumpkin Pie

Three easy step to cute pumpkin decor.
1) Trace a pumpkin shape.

2) Cut out pumpkin.

3) Paint the pumpkin.

Thursday, August 29, 2013

Next Weeks Challenge is a Pinterest Recipe

Instructions (I just spelled that wrong three times ... sheesh...)

1.  Browse Pinterest for hours and hours to find THE recipe that speaks to you.

2.  Make the recipe in your head and then really make it.

3.  Yes, we want photos, at least three.  And if one has you with flour on your person you get extra points.

4.  Taste said recipe and critique it.

5.  POST IT!

A Cluttered Cupboard

Organization one cupboard at a time.  (Plus a little counter space as well)  This is our craft/school supply cupboard which sort of spilled onto the counter due to Summer fun.  We gained and lost school supplies when school started two weeks ago.  Putting stuff back was key...and getting rid of half the stuff was even better.

Crazy Mess!

Emptied cupboard which causes more mess.

A more organized supply center.

Tuesday, August 27, 2013

Organization - Closet

Step 5:  Let's work backwards for a change.
I used the same boxes I had in the closet but
purged a bunch of duplicates & things we just
don't use any longer.

Step 4:  I took out my accordion files and
really took a hard look at the paperwork we
needed to keep.  I pared it down to three files
with 7 yrs tax return docs and 2 yrs of
everything else...just in case.
The black boxes are the kids art since
Kindergarten.  I photographed much of it
and then saved the best by year.

Step 3:  Sand, fill, sand, fill, sand, sand, paint, paint.
Sing along if you know this one.  The closet was
dingy so I painted it with the left over paint
from the master bath.  Look at me being green!

Step 2:  Take everything out of the closet.  I sanded the shelves
and added a thin layer of polyurethane.  Then I sorted and put
things in the garage sale pile.  No I am not looking at that
pile for now.  Saturday it will be gone... gone I say!

Step 1:  Look in closet. Yikes! Typically, this is pretty
organized but I have been adding to it over the summer
so it got out of control.  I had a lot of school supplies
that were handed out and then it was purge time!

Thursday, August 22, 2013

Let's Make a Plan

Okay family.  A few of us - okay, all of us - have been talking about doing posts more regularly to get ourselves more steadily motivated.  So, let's come up with a plan.  Here are the questions we need to answer:

1.  How often do we want to post?  Weekly?  Twice a week?  Twice a month?
                       I vote for weekly.
2.  What do we want to do?  One week of home improvement, i.e. frame enhancements, knocking down walls, etc, one week of creativity, one week of Pinterest projects, etc, etc  What floats your boat?
3.  Do we all post on one day or shall we spread it out a bit or rotate it?
4.  How do we keep each other motivated to keep it up?

I say let's start dragging those friends in that might as well be family - Kylene!, And let's get sister-in-laws and our brothers to get involved. (I was going to say to get off their collective bums but that really only applied to the brothers.)

What say ye?

Come on.  Get it up there a little higher! 
With enthusiasm!!

Friday, August 16, 2013

Cookie Butter Sandwich Cookies Day 5 of 5x5


Cookie Recipe (Modified from keepitsweetdesserts.com)

1 cup flour
1 1/2 tsp baking soda
1/2 cup butter, softened to room temperature
1 cup Cookie Butter (Trader Joe's)
3/4 cup sugar
1/2 cup brown sugar
2 eggs
1 tsp vanilla

Mix together flour and baking soda in medium bowl.  In a large bowl mix together butter, Cookie butter, sugar and brown sugar.  Beat in eggs and vanilla until fluffy.

Add flour mixture to wet until combined.  Chill for at least 2 hours, overnight is fine.

Use a 1" ball scoop to make the same size cookied.  Place on parchment and bake for 9-11 minutes until lightly brown around the edges.  Cool on sheet for 5 minutes and then on a cooling rack until completely cool.  You can now put them into a sealed container until you are ready to fill them.  (I did them the day before and they were perfectly crisp.)

Fillings

Salted Caramel

1 cup butter room temperature
1 cup powdered sugar
1/4 cup salted caramel (store bought or http://www.twopeasandtheirpod.com/salted-caramel-sauce/ )
                                           This is soooo worth making!

Beat together until fluffy.

Chocolate

1 cup butter room temperature
2/3 cup cocoa powder, sifted (use what you have, Dutch, natural, etc.)
2 cups powdered sugar (Add more if you want it sweeter and thicker up to 1 more cup)
1/3 cup heavy cream
1 tsp vanilla
Pinch of salt

Beat butter until fluffy.  Add cocoa until combined.  Add sugar and cream alternating 1/2 cup to 2 Tbls beating in between.  Add vanilla and salt until combined.  If it seems runny add the extra sugar here.

Put it together

Place half of the cookies with the top down (you are frosting the bottoms).  Frost liberally!  Place top on cookie.  Serve flat or the top will slide off.

Berry Hand Pies ...not.

 This is a modified recipe from Martha Stewart.

Step 1: Crust
Whisk 2 Tbls sour cream, 2 Tbls lemon juice and 2 Tbls ice water in small bowl.
Place in fridge until ready to use.
With a mixer on medium beat 2 1/2 cups flour, 1/2 tsp salt, 2 tsp sugar and 1 cup
butter cut into small pieces until it resembles coarse meal with a few larger pieces.
Gradually beat in sour cream mixture until it is just combined. (Squeeze together a
small amount to  see if it holds together.  Add 1 tsp of water at a time if needed.)
Divide dough in half and flatten between two pieces of plastic wrap. Place in fridge
for at least 45 minutes.

Step 2:  Stir together 1 1/2 cups blackberries, 1 cup raspberries,
2/3 cup sugar, 1/2 tsp salt and 2 1/2 Tbls cornstarch.  Chill
for remaining time on crust.

Roll out the crusts to be a rectangle - about 8" high and as long as possible. 
You want a very thin, almost see through, crust.  I kept it in the plastic
 wrap and it worked great.  Cut into 8"x4" pieces and
place on parchment on a cookie sheet.

The recipe did say to do it but I drained the berries after making a mess with the
first hand pie I made.  Place about 2-3 Tbls berry mixture onto crust and crimp
with a floured fork
Step 3:  Freeze them until you are ready to bake at least 1 hour.
(I didn't bake them for 6 hours and it was great.)
Bake at 375' for 35-40 minutes turning half way through.

Step 4:  Find willing eaters!  I added a dollop of my stabilized
whipped cream.  The girls tried to pick them up but it wasn't
working.  So, less  hand pie and more fork pie.
But still delicious!

Lazy Days- 5 x 5

I battled with myself as I dropped the last kid off at school today. My mind told me that I should be industrious and do an amazing final 5 x 5, but my heart yearned to just curl up with a good book and relish in the quiet. My heart kinda won out as a head cold crept in this afternoon, but I figured that if there was any goal that I could accomplish it would be this one.

So, lame as it may be, I decided to finish this goal by jump starting another goal that I have for the year... get back to writing.

As you can see, I had recently repurposed my writing table into a collect-all clutter fest. It was working well for that, but with school starting, my excuses have run dry.


In far too short of a time I had the desk surface shining back up at me. One last excuse swept into the dust bin. Now, on to other goals :)

Suzanne's 5x5 Day 5

Ok, my magnets were a really small project yesterday, but I was working on my piece for today.  

Ta...da...A Magnetic Board!  
I painted the frame yesterday.  Today I walked the aisles of Lowes to find the last piece of sheet metal.  By the way, it was in the plumbing/duct area.  It was 24x30 and slight bent on one end.  I figured it was the last piece, I better take it.  Luckily, when I trimmed the metal down, the bent area didn't matter. 

Fit the metal into the frame.  Tacked it in with glazer points.  Threw it next to the wall.  Called it nearly done, or good enough for today.

Debbie's 5x5 #5.2

Upcycled Baby Jeans

Step 1: Make a pattern. I simply overlapped a pants pattern at the side seams.  I forgot to take into account the hem.  As you will see later. The reason for overlapping the side seams is so that I can take advantage of the already existing side seams in a pair of broken jeans. And the hem.
 Step 2: Cut apart a pair of adult size jeans along the inseam. Lay out your pattern with the side seam running approximately down the middle.
 Step 3: Sew up each leg separately.
 Step 4: Turn one leg ri!ght side out and tuck it into the other leg.  Match up the leg seams and sew from the top of the front to the top of the back.  At this point your jeans are all done except for elastic casing! Sew a casing and add your elastic.  Done.
 Step 5: Find a model and take pictures.

As you can see, the legs are a bit long...but I'm not about to change them.  They will fit Henry soon enough.
Side seams!

Free jeans!

Debbie's 5x5 #5

It can be a lot of fun to sew for girls - tons of fun fabrics, ribbons, laces, styles, etc.

Boys?  Not so much.

I did find some cute 'boy' fabric when I was in Idaho last month.  The line is "Backyard Baby" - and it was love at first sight.
I plan on making a short sleeved, collared shirt for Henry out of the top fabric "Backyard Party".

I haven't decided what I'm going to do with the 'Ant Maze' - but I'm happy to have it!

awesome.
I made some overalls for Henry to wear with the shirt I plan to make.  They're pretty cute...and might actually come close to fitting him in about 6 months. Or 8.
I'm not technically 'done' - I still need to add 4 buttons (two at the top and two on the side cargo pockets) - I plan on buying some buttons this afternoon - but I might not get them on today due to date night.

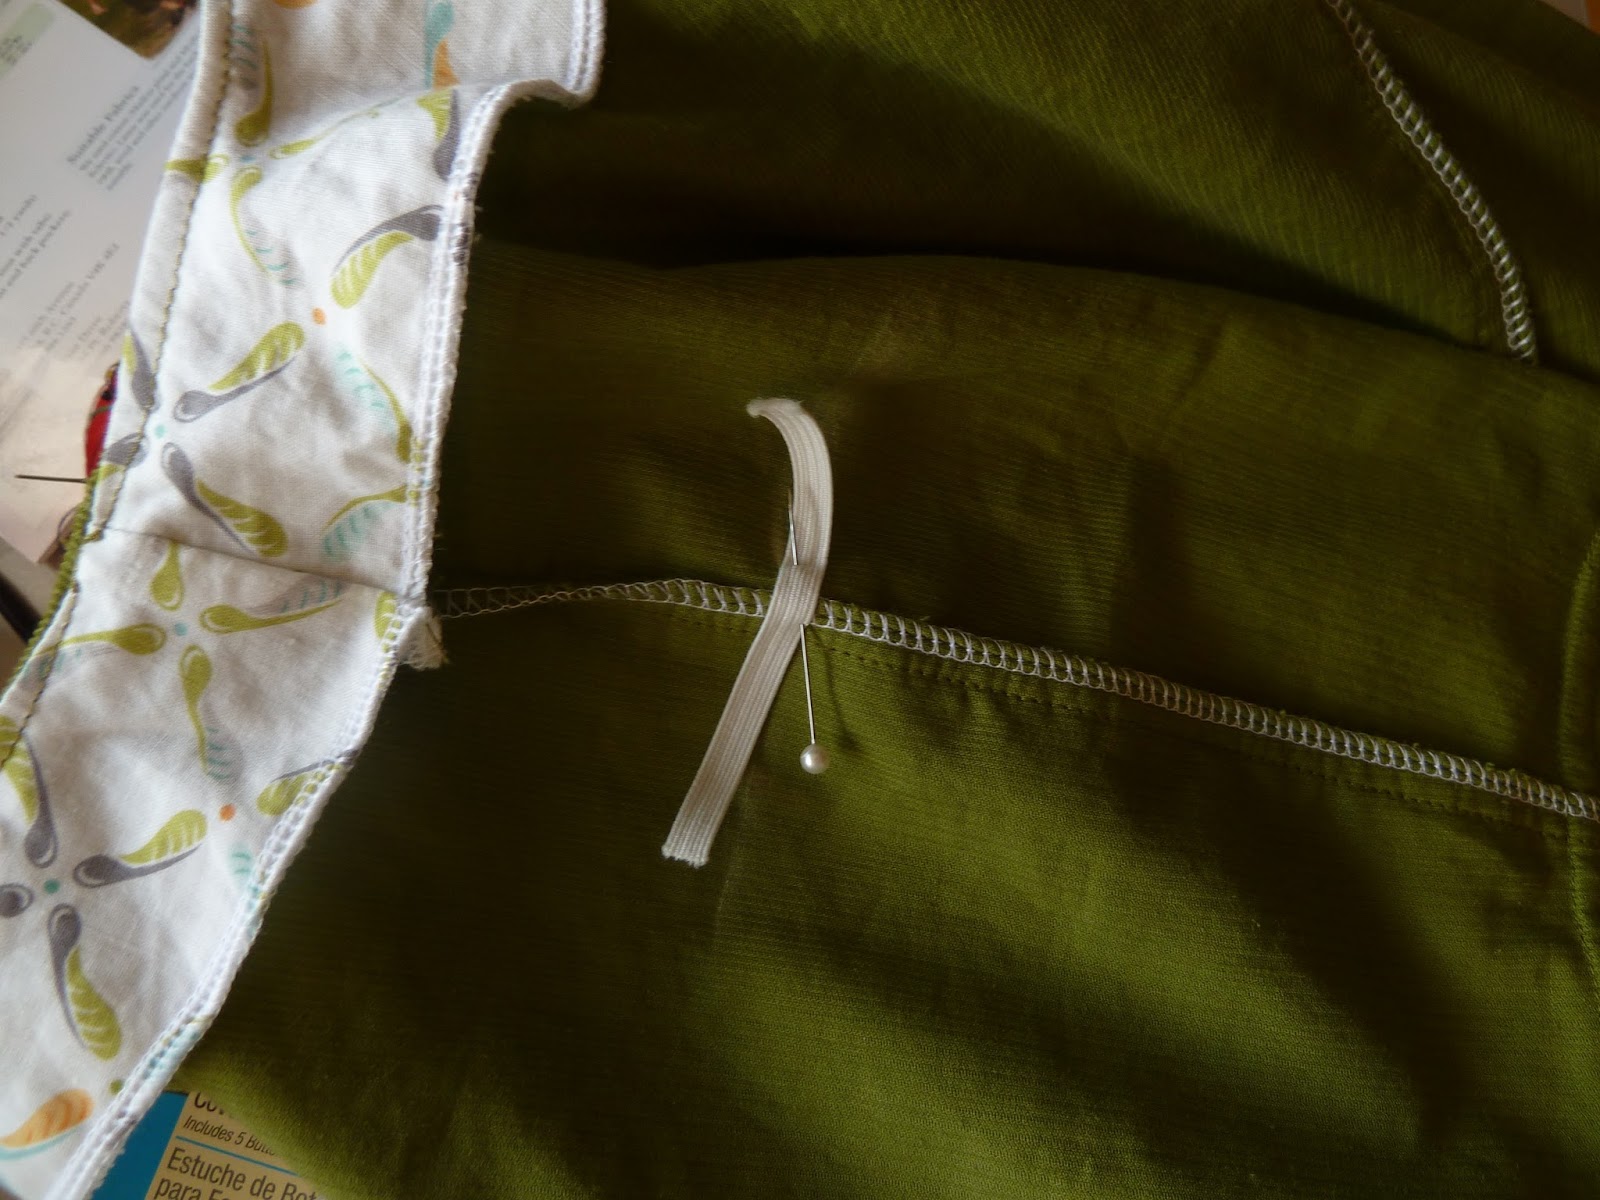
The overalls looked ginormous on Henry - so I added a bit of elastic to each side.  I drew a chalk line and then stretched the elastic while zig-zagging (I worked my way out from the side seams). The overalls are still huge, but hey, it's better than being too tiny.

Thursday, August 15, 2013

Keira's 5x5: Day Four

In our Picnic Basket:  Salt and Pepper Kettle Chips in a brown paper bag with washi tape, Trader Joe's English Toffee and Caramel Corn, and Raspberry Juice (with plaid red paper and black dot washi tape (I'm so hipster!)), and avacado, bacon, cracked pepper sandwiches. 

We went to the Mother/Daughter Pool Party and this was my chance to make it extra super cute.

Maren did her part.

Times Eleventy!

But the Applewood bacon was no slouch either.

And the avacado sang.

Hung up!

3 x 5 continued... I popped over to Suzanne's to today and finished up the art work from yesterday. Sanding, staining, and some more woodburning, and now they are done!

The shark has been pickled and looks ready for the beach.


My favorite of these 3 is the moose. It was extra work, but so worth it :D


Kevin was on his way out the door this morning and asked casually what my plans were for the signs. I shrugged and admitted that I really didn't have any. He then pitched that he would be willing to find a place on our crowded walls for the map if I was willing to keep it... He didn't have to twist my arm! And now it is hung high up in our map filled living room... Sorry everybody else ;)

Debbie's 5x5 #4

Upcycled Button Caddy

I found this spinning condiment caddy at Target a few weeks ago.

I love the fact that it spins.

I also love fun shaped jars.

Add the two together, along with a couple of coats of black chalkboard paint, some goo-gone and there you have it.

Sorted buttons at my finger tips!

                  Jars from L to R:  Jam, sun-dried tomatoes, stone-ground mustard, lemon curd, some kind of spice.

Suzanne 5x5 Day 4


I'll give Debbie 1/4 credit for today's project.  I stole the idea off her Pinterest board.  So with a bit of underhanded sneakiness I give you...

Magnets!

Not just any magnets, they have coinage from around the world.  

Strawberry Rhubarb Flummery filled Cupcakes with Stabilized Whipcream Topping - Project 4 of 5x5

So, there are three recipes here to get to one absolutely fabulous cupcake!


Cupcake

1 box French Vanilla Cupcake mix made per instructions
1 vanilla bean soaked in 2 Tablespoons of water for 30 minutes

Remove vanilla bean and split open full length of bean half way through the bean.  (You are laying it open.)  Take the edge of a sharp knife and scrape out seeds.  Stir seeds into cake mix and let it sit for about 20 minutes covered.  Bake per instructions for cupcakes.

Flummery

3 cups rhubarb cut into 1/2" pieces
1 Tablespoon water
1 cup sugar
1/4 cup cold water
3 Tablespoons cornstarch
1 cup strawberries, washed and sliced into medium sized pieces.
3 drops red food coloring

Heat rhubarb, sugar and 1 tablespoon water in a 3 quart saucepan until it boils - about 3-4 minutes, reduce heat.  Simmer uncovered about 5 minutes, stirring occasionally, until rhubarb is tender.  Mix cornstarch and 1/4 cup cold water, stir into rhubarb mixture.  Heat to boiling, stirring constantly.  Boil 1 minute.  Remove from heat, stir in strawberries and food coloring. (You may want to add another drop or two until it looks red/pink. 

Let this cool to room temperature.  Don't put it in the fridge, it gets a little goopy.  (NOTE:  I had to strain, through a fine mesh colander, my first batch because the rhubarb was stringy but the second one was fine.)  If you want it a little less chunky stir flummery when cooled to break up the strawberries.

Stabilized Whip Cream Topping

1 tsp unflavored gelatin powder
2 Tablespoons cold water

2 cups heavy whipping cream
4 Tablespoons confectioner's sugar

In a glass measuring cup sprinkle gelatin over 2 Tbsp cold water, stir to dissolve.  Place in fridge for 10 - 15 minutes until is the consistency of an unbeaten egg.  Whisk until smooth.  Replace in fridge until time to add.

In a chilled tall sided bowl - or a regular one - beat heavy cream and sugar until soft peeks form - don't go a moment longer!  Add gelatin and beat in for about 20 seconds.  Place in fridge until ready to use.

Now let's bring this baby home....

Rhubarb Flummery filled Cupcakes

Core your room temperature cupcakes so you can fit about 3 - 4 tablespoons of flummery in the center.  Eat each core.  No really.  Go ahead.  Place flummery in a large baggie and snip off one corner.  Fill each cupcake to the top but don't over fill.  Place whipped cream in a piping bag with a very large tip.  Pipe cream over top of each cupcake.  Place fresh washed and dried strawberries on top. 

These will sit out very well but should be refrigerated until ready to be served.

These don't take very long to do really.  I started the cupcakes and made the flummery.  While the flummery was cooling I made the whipped cream.  The cupcakes took 10 minutes to cool in the fridge so really it was about a 40 minute process to do 2 dozen.

Wednesday, August 14, 2013

Suzanne's 5x5 Day 3

Let's just say, none of this is for my house.  But they are projects that I need to get done so they can leave my house.  (And Tia gets 1/2 credit ;)  Lots of sanding yesterday and today, vacuuming, blowing, getting rid of dust, and the first coat of primer on.

Primed nightstand and desk
Pinterest inspired coffee table;
Nearly done staining and ran out!
Industrial Chic Coffee Table on Castors
I'm in a paint fume haze as I try and type this post.  Let's just say, I might need a break from the paint for a day or two.