Pages

where sisters, sibling rivalry, and creativity collide.


Tuesday, August 13, 2013

Project 2 of 5 OR Didn't I just do this?

Step 1: Take seat off chair.  Mine had four screws
in the bottom so flip it over on the table top for easy removal.
Strip the seat using an Exacto knife (or you can pull out
a thousand stupid staples that you are covering up)
Step 2:  Buy 1"-2" dense foam. Draw out seat on to foam.
Using an electric knife cut out foam with a slight angle
from seat to top. (Straight will make it look too boxy.)


Step 3:  Make a pattern for the new cover
fabric. You can measure or just eyeball it.
Step 4:  Using your pattern, a long ruler, and pattern chalk, draw
out the new seat covers.  If your material has a
pattern you need the ruler to get the material straight. You do
not want to cut corners and fold the fabric to make several
at once unless it is a solid color.


Step 5:  Center your foam and seat on fabric. Glue foam to
seat - any foam approved glue is fine.
 Using a staple gun, electric or hand, place a single staple in
the center front, pulling firmly do the same to the back and then
the sides.  Place staples about 1" apart (depending on the fabric).
I used a thin staple that doesn't damage the fabric too much. 
When we bought this dining set 14 years ago it had black seats.  After just three years they were destroyed by food, paint and feet.  The blue I used to recover them then held up quite well but it was time for a change.  Lauren and I found the fabric at Britex in San Francisco.  

Monday, August 12, 2013

Bathroom - If you give a Hanna a Cookie...

Hideous fluorescent fixture Jim swore he would replace
upon purchase of home ... 14 yrs ago.
I took a small sledgehammer to the light box.
Connor helped with the Saws-all.
Nice work.


New fixture.  What you don't see is the two weeks of
work filling, sanding, filling, sanding (x infinity)
and painting.

New shower area fixture too!
(The old one was 'accidentally' broken when I was painting.)


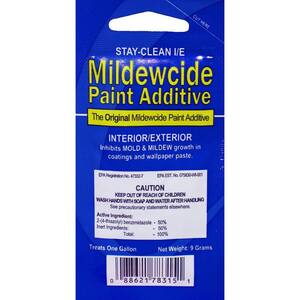
 So, this all started out as a mold problem.  Our bathroom has a 10' peak and poor ventilation. I went to Home Depot who sold me some great Behr paint that had a mildew inhibitor in it.  But as I was talking to Hal - yes, I know the paint guy by name - he said with a problem this bad I may want to try a mildewcide.  This is what he recommended.  It didn't change the color or texture of the paint and gives off not fumes. 


So, the pictures above are also of my 1 1/2 weeks of cleaning, sanding, filling (x infinity) and painting the bath and vanity areas.

How to Prep Art for hanging in a bathroom

1.  Select art for bathroom that is from archival materials which is more likely to withstand the humidity.  Painted art or art printed on acid-free paper works best.

2.  Varnish painted art.  This will preserve and protect it from the moisture.  Apply a thin coat or use spray on varnish.  You do not have to do this with art printed on acid-free paper.

3.  Protect printed art in a frame, glass or plexiglass.  Mount printed art on archival quality foam core that is acid and lignen-free.

4.  Do not let the art touch the glass but it should be sealed completely in the frame.  I used GE Premium Waterproof Silicone - clear.

Vanity "Yellow Bike"

These prints are from a local (SF) artist.
"Clock"
Go to:  www.fonarow.com


Artist is Craig Fonarow Photography
"Orange Trolley"
 

1 x 5 for Tia


I shook my head sadly around 4 o'clock thinking that I had frittered away my day without accomplishing my 1x5 for today... But then I remembered that my busy day did accomplish something.

I am in full prepping mode for school, and this year all of my rugrats will be taking bagged lunches, special snacks, and one has a dietary restriction (yep, I am now THAT mom).

So, after a massive shopping trip, Ana, Cam and I emptied out the pantry and started fresh. We sorted out the all of the breakfast foods into what Cam could eat and what he couldn't. Then we prepackaged snack foods for lunches and sports into snack baggies, then sorted them into healthy or treats, and then sorted them into what Cam can have and what the others can have. The lunch stuff has its place, Kevin's snacks and breakfast stuff has a place, and my foods are all sorted and combined into one location.

Whew! I made it. :D

Suzanne's 5x5 Day 1

 I'd like to think that I managed to clean my house from top to bottom, aired my sheets, and made a three course dinner.  What actually happened was; I aired my dirty laundry, painted some furniture, and went back to school shopping.  Dinner is on the maybe list for the day.

First Item accomplished today;
Plain Grey Farmhouse Bench
Added a White Stripe
Added another white stripe for awesomeness!
These are the "Rustic" Console Tables that Tia has been building and I sand/paint/sell them. 

Before pic
After pic


Kylene's 5x5: Day One

Remember what Debbie said about no rules? Well as an "Imagined Hanna" I am submitting my project.
I canned peaches!  I know that this isn't such a great feat but it was my first time and I thought that I had this under control but when it came down to it there were a LOT of questions and hardly anyone available to answer them. Also, let's talk about how much I hate my electric range, it takes an hour to heat up the water bath and 20 minutes to get the water back to boiling with the peaches in. 19 jars of peaches. (5 are still in the water bath)

I have also been working on getting my Pandora stations working -that is a lot of work too.

Keira's 5x5: Day One

You'll have to forgive the muddy Instagram-ness of my images.  Our camera gave the fullest measure of devotion on a beach trip last month and Nathan hasn't decided that it's really, truly dead, dead, dead.  In the interim (as he travels the pathways of grief--the first step is Acceptance...), I have to contort myself a bit on my tablet.

But I digress...

For day one I chose a project that I actually MOSTLY completed last week.  (Remember when Debbie said there were no rules?  Let's test that, shall we?)  We're headed to a wedding in a couple of weeks and are closely related enough to the principle players to merit color-coordination.  Purple is the hue and I decided to sew something up rather than hunt the shops.  But, after the fabric was purchased and everything, I found that I just couldn't put my infant in purple.

What I ended up with is a great coordinating look for girls with very different ages and style needs.  A pop of plum grosgrain in the sash with a flat off-set bow and purple covered buttons complement the quiet grey spotted number.  And for Laura, the trick was giving dimension to such a simple broadcloth.  The grey does it but I had to know when to stop.

She says she likes it but maybe my next project will be teaching her not to schlump and eye-roll when I ask for fittings...