Pages

where sisters, sibling rivalry, and creativity collide.


Monday, August 12, 2013

Debbie's 5x5. Day 1

Passport Renewal !!!
  • Yes, this was my project.
  • No, it is NOT a craft.
  • ...remember the part about "no rules".


My passport expired nearly 2 years ago.  Yikes.  It's hard to be a world traveler without a valid passport.

Steve has been giving me a bad time about it lately (he renewed his last year or the year before...for work), but I admit I haven't really wanted to deal with it.  This week's challenge was a nice little nudge to get off my backside and get it done.

Since it wouldn't be much of a project without some kind of tutorial, here goes:

Step 1.  Look up passport renewal online. http://travel.state.gov/passport/renew/renew_833.html
Renew by Mail if All of the Following are True:
Your Most Recent U.S. Passport:check image  Is undamaged and can be submitted with your application
  Was issued when you were age 16 or older  Was issued within the last 15 years  Was issued in your current name or you can legally document your name change
If any of the above statements do not apply to you, you must Apply in Person
Step 2. Fill out application form, then print it out and sign it.
Step 3. Find check book and make out a check for $140.00 (that's for a passport AND a passport card).
Step 4. Brush your hair...then drive to Costco and get a passport picture taken.
Step 5. Staple picture to application (borrow stapler from Post Office employee).
Step 6. Mail application (along with payment and old passport).
Step 7. Wait (I believe the turn around time is 6-8 weeks). Also cross fingers that you filled out the application properly and remembered to put everything in the envelope.

I Can Play It! Songbook

The Friend magazine has been printing simplified children's songs since January 2012. Now that my children are beginning to play the piano, I wanted to put all those songs in one place to encourage them to use them.

Project Supplies:
printer and paper
sheet protectors
3-ring binder (or 3-prong folder)
I Can Play It! songs (this link is for the plain black and white copies)

Project Instructions:
Print
Slip into sheet protectors
Insert in binder
Done!

Note: If you want to go fancy with the full-color PDF versions, it gets trickier: Go to the Friend, open each magazine, starting with January 2012, find the song in the Table of Contents (use the previous link to know the name of the song you're looking for), and click on the song title. For most of 2012, you then look at a bar on the right. Go to download, then click PDF for the color edition. For 2013, you will see the PDF. Just click (click to view larger) and print.

Monday, August 5, 2013

5x5 Challenge!

Next week (August 12-16) we're going to have a 5x5 challenge!  Post one project you've done each day next week.  What kind of projects?  Whatever floats your boat.  Crafting, organizing, cooking, building, sewing, painting...what. ever.

Who can participate?  Any Hanna girl or boy...real or imagined.

What's the prize?  Are you crazy? We don't lower ourselves for filthy lucre or shiny trophies (although that might be a fun project....) We offer prizes that matter - satisfaction in a job well done and bragging rights.  Especially bragging rights.

Here's the rules:

1. ...er...there really aren't any.
2. no, really, there aren't any.

Let the games begin!

Friday, July 12, 2013

Dare to Design 2013

It's time for Shabby Apple's annual Dare to Design contest! This year's inspiration comes from the 1940s.

First I watched "Anchor's Aweigh" (1945). Or rather, I watched Kathryn Grayson. For as frugal and rationed as the war years were, she had quite a nice wardrobe. By day she had serious separates, but what I really loved were her long, flowing evening dresses. Still, they had plain, jewel necklines. That wouldn't do.

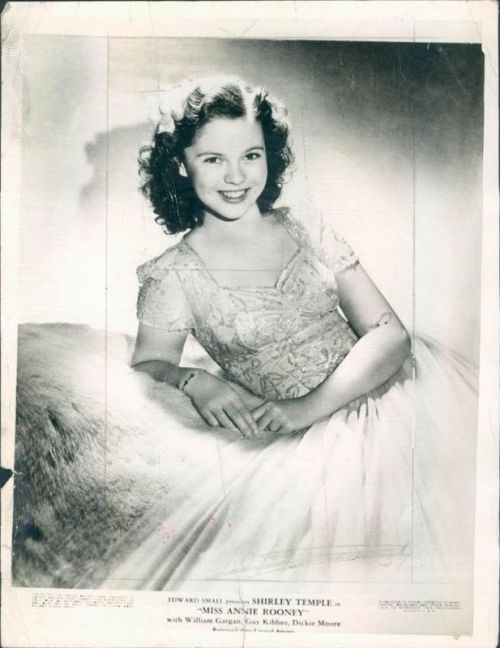
My real inspiration came from another war movie: "Miss Annie Rooney" (1942). Annie spends most of the movie in her wardrobe of school separates. Near the climax of the movie, her grandfather pledges his pension to buy her an evening gown on credit, so she can attend the formal birthday dinner and dance of a chivalrous young gentleman she likes. With a sweetheart neckline and flowing chiffon skirt, she is a vision of loveliness in spite of wartime rationing and an underachieving father.

My design incorporates the sweetheart neckline, and a bodice with princess seams and ruching (vertical gathering). The ruching is echoed in chiffon over the lined cap sleeves. I shortened the flowing chiffon skirt to a figure-flattering tea length, making it more versatile for the modern woman. 

This rosebud-pink chiffon vision could be springtime's "little black dress." It would look lovely at an outdoor wedding, church, or a garden party. With a jacket, it could go to work; with some sparkly jewelry, it could transition to evening as well.


Tuesday, June 18, 2013

New Beach Tote

Here's what I love about summer. ...

I go to JoAnns with L and we both gasp at this super cute bicycle burlap material.  I say, "Oh, that would make such a cute tote!  For the beach! Oh, please?" And she says, "I think I will design it myself.  How long do you want the strap?".  Perfect summer day.  Two days later, I get a new cute tote.  L says it will be worth $1000 in 10 years so keep your hands off my tote!

(We (that's the royal we) are up to one week off school and three cute projects, two of which I was the beneficiary!  Nice.)

Upcycled Cargo Shorts Car Organizer

I didn't think to take  any 'before' or 'during' pictures...but this is such a simple concept - it really doesn't need too much explaining. Here's how I did it:

1. Find an old pair of cargo shorts/pants.
2. Cut off the leg.  I had about an inch below and half an inch above the pockets that was usable.
3. I took in one side so as to make my organizer more rectangular.
4. Stitch across the bottom.
5. I then stitched across the bottom corners - only about 1/2 an inch or so.  This gives the organizer a little more depth.
6. Cut and sew lining. I simply traced and added seam allowance.
7. Determine how long you want your strap, and the placement. Pin in place.
8. Insert lining and pin to outer fabric.
9. Top stitch lining to outer fabric, including strap.
10. Add a second row of top stitching for added strength.


Monday, June 10, 2013

Key Fob

I think that we have lost the fine art of having key fobs.  Lauren was asking for something to do yesterday and I told her I wanted her to make me something cute.  So this is her creativity at work.

The other side is green with a sad face. 


She did a great job stitching by hand the eyes and mouth.

Expect more crafting this summer.  And let's see some posting!